Every smart homeowner is looking for ways to reduce housing costs wherever possible. Unless your home is on the newer side and specially constructed to conserve energy, then you should think about adding more insulation. Upgrading insulation and attic efficiency will result in reduced energy bills, plus it’s a project that will pay for itself within a few years.
Professional energy assessment
To determine whether you should add insulation, first establish how much insulation you already have in your home and where it’s located. A qualified home energy assessor will include an insulation check as a routine part of a whole-house energy assessment. An assessment helps determine how much energy your home uses, where your home is inefficient, and which problem areas and fixes you should prioritize to save energy and heighten comfort. A home energy assessment should be your first step.
A professional assessment will provide a detailed analysis of your home’s energy use. In addition to a room-by-room examination, a home energy professional might utilize equipment such as blower doors, infrared cameras, gas leak and carbon monoxide detectors, moisture meters, and non-toxic smoke pens to identify areas of your home that need air sealing.
Air sealing, which should be done prior to adding insulation, is a cost-effective method to cut heating and cooling costs, improve durability, increase comfort, and create a healthier indoor environment. Two common techniques that offer quick returns on investments (one year or less in most cases) are caulking and weatherstripping.

Where and what kind of insulation
After sealing leaks, you must determine whether you should add insulation and where, what type of insulation you have, and the R-value and thickness of the insulation. Keep in mind that thickness should be the sole factor to determine the R-value of loose-fill insulation, particularly for attic insulation.
A label you’ll find on the insulation will disclose the R-value per inch (a measure of resistance to heat transfer). A higher number means a more effective insulation. In tight spaces, like wall cavities, you’ll need a high R-value per inch. In roomier spots, like the attic or under a floor, you can increase the value simply by using a thicker layer.
As well, realize that the more insulation you add, the more you’ll save. Consult the Department of Energy’s website for zip-code specific recommendations for the right amount of insulation for your climate.
Attic
Start in the attic because adding insulation there is quick, cost-effective, and easy. To determine how much you should add, research the recommended amount for your area, then subtract the value of your existing insulation. In unfinished space, simply add layers to what is already there. However, if finishing the attic is on your future radar, you should insulate against the roof, which is a better method for humid climates.
For DIY jobs, blanket-type material is easiest. Be aware that if compressed, it loses effectiveness. If you’re hiring a contractor, use loose-fill cellulose or fiberglass to better fill crevices. For a pro to blow in material, it will cost you about $1 a square foot; DIY batts will cost about half that. For roof insulation, sprayed foam polyurethane works best because it molds to rafters, blocks water vapor, and has a high R-rating per inch. This method is about double the cost of loose-fill insulation.
Pro Tip: Federal tax credits of up to $500 are available to defray the cost of materials.
Walls
If your attic has enough insulation and proper air sealing, and your home still feels drafty and cold in the winter or too warm in the summer, chances are you need to add insulation to the exterior walls. This is more expensive and usually requires a contractor, but it may be worth the cost—especially if your winter climate leaves you feeling extra cold. If replacing the exterior siding on your home is in your near future, consider adding insulation at the same time.
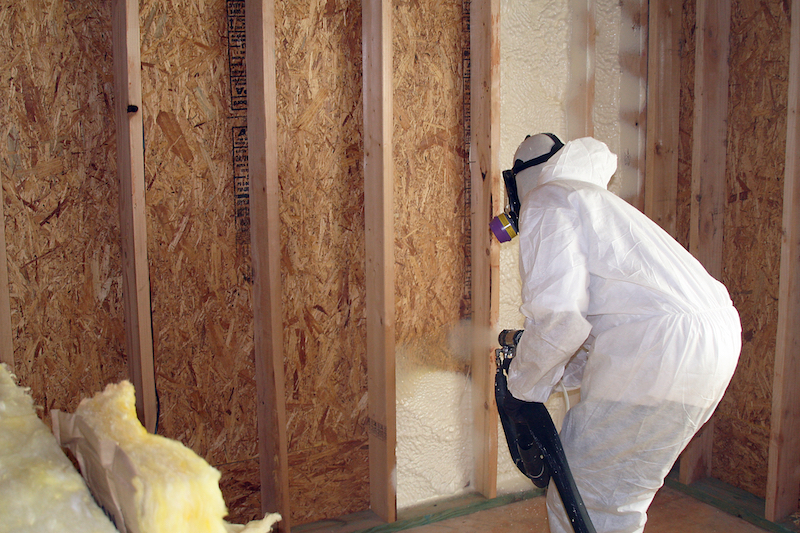
Adding insulation in stud bays is easy. A contractor can blow in material through small holes inside or outside walls. This will cost about $1.25 per square foot for loose-fill fiberglass, cellulose, or rock wool, or $4.40 for polyurethane foam, which insulates twice as effectively.
Basements and crawl spaces
Besides the top and sides of your house, the bottom should also be insulated. You can add insulation beneath the bottom floor and consider the crawl space or basement as outdoor space, or you can insulate the walls and consider it as indoor space. If you decide to consider it as indoor space, then shut off all exterior vents except those required for combustion air or exhaust. While floor insulation is more conventional, wall insulation has advantages, including cost, as only about a third of the material is required for wall insulation versus the subfloor above.
Floors above unheated garages
When insulating floors above unconditioned garages, first seal all possible sources of air leakage. This will minimize the danger of contaminants that may be stored in your garage (like car exhaust, paint, solvents, gardening supplies, etc.) seeping into the conditioned space. Also install an air barrier to prevent cold air in the garage from “short circuiting” the insulation underneath the subfloor.
Even if you live in an older home, there’s no reason to freeze in winter or roast in summer. If your house lacks proper insulation—which is common in homes built before 1980 when energy awareness began to raise—then raising it to current standards will provide your family more comfort year-round. As an added benefit, you’ll save anywhere from 10 to 50 percent on heating and cooling bills.


